Electric SEA Workshop #1
Bootstrapping interactive installations with MIDI
Over the course of this two-day workshop (Thursday 3/26 – Friday 3/27), you will:
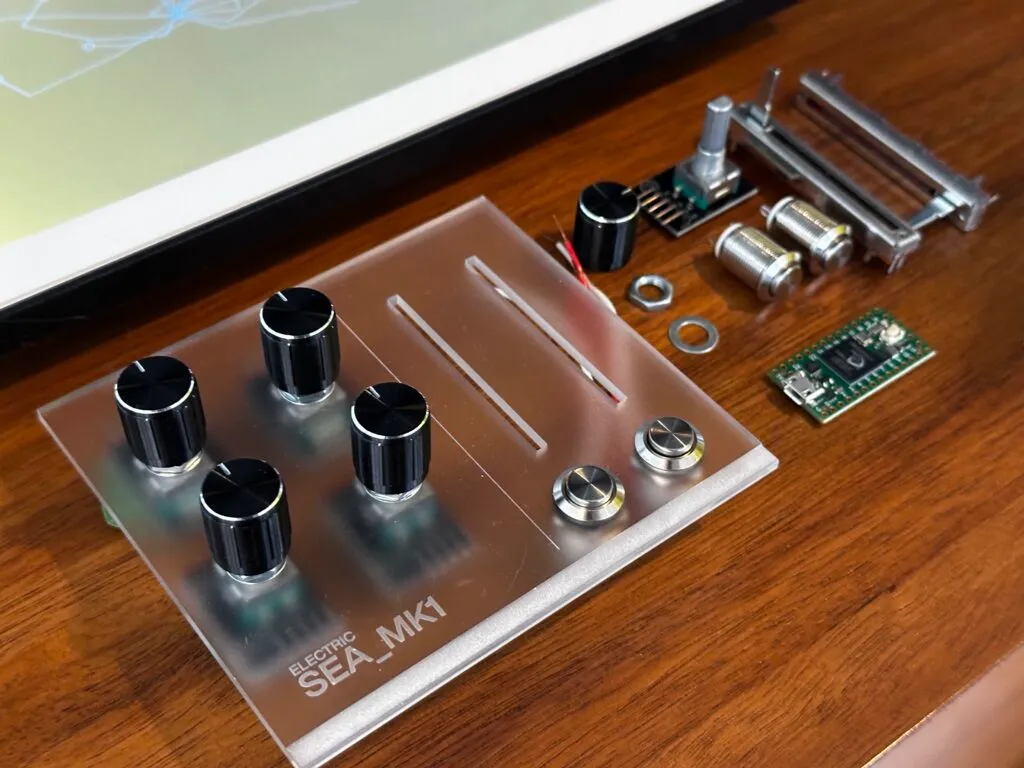
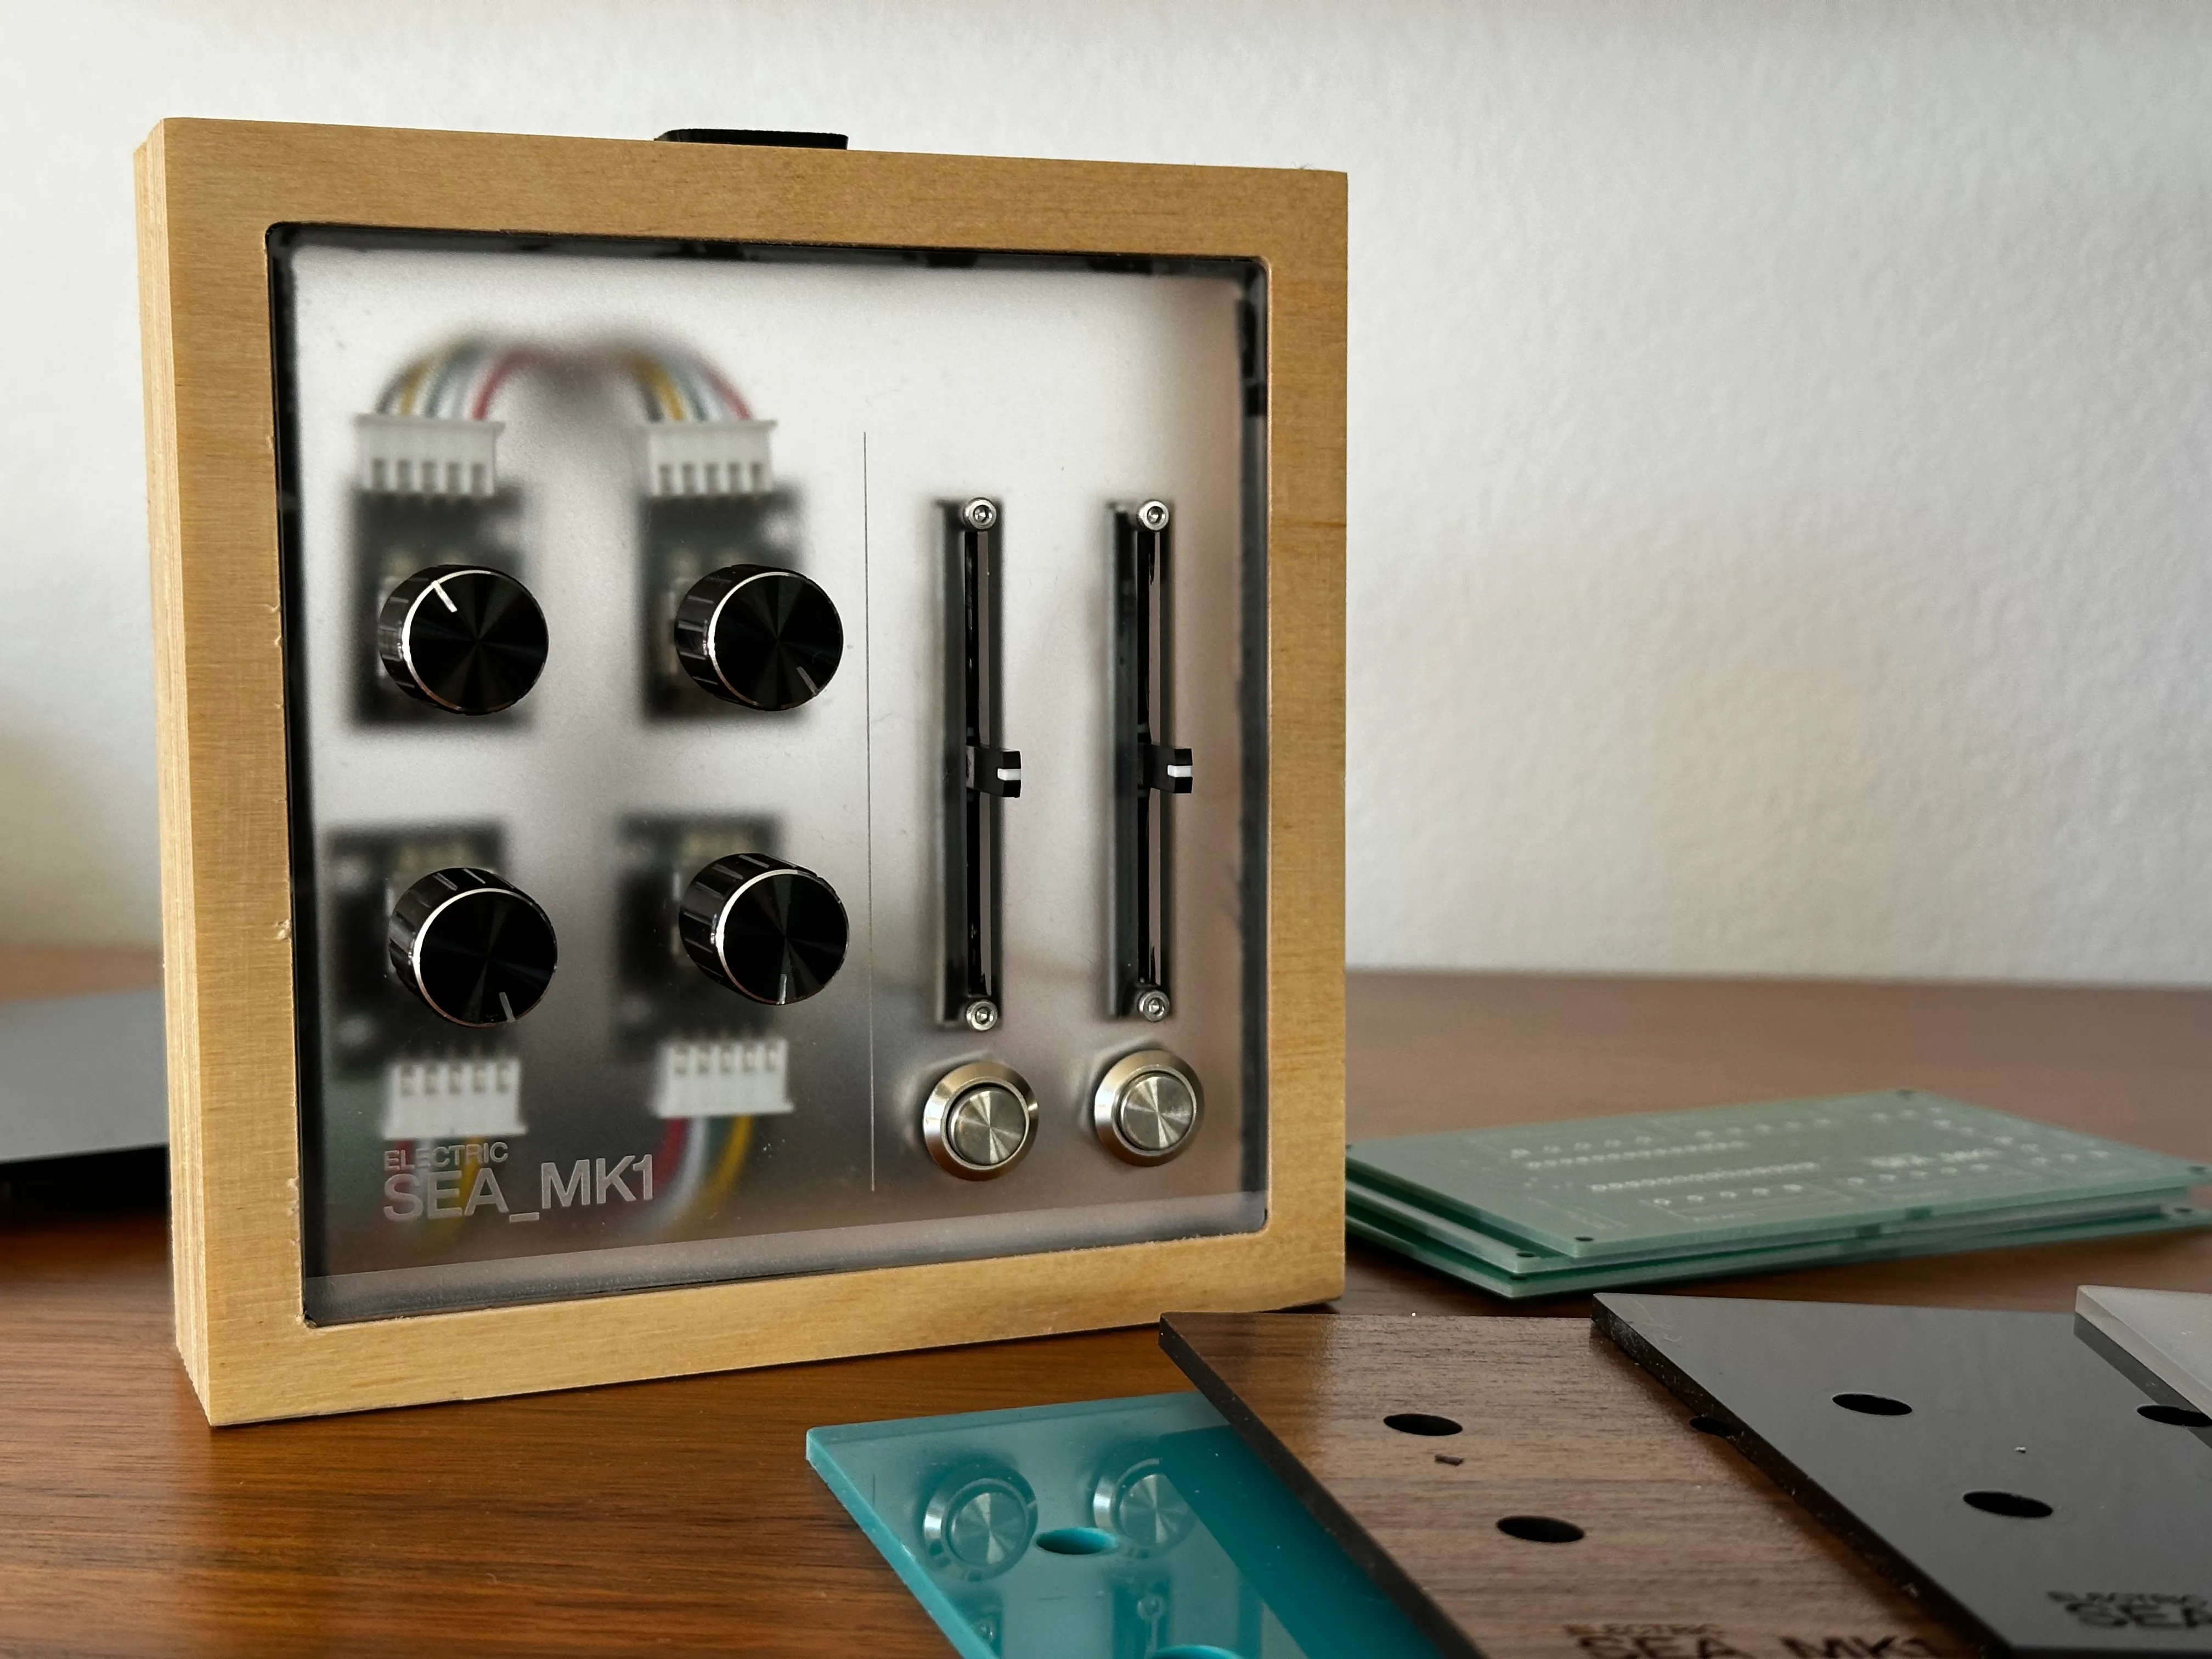
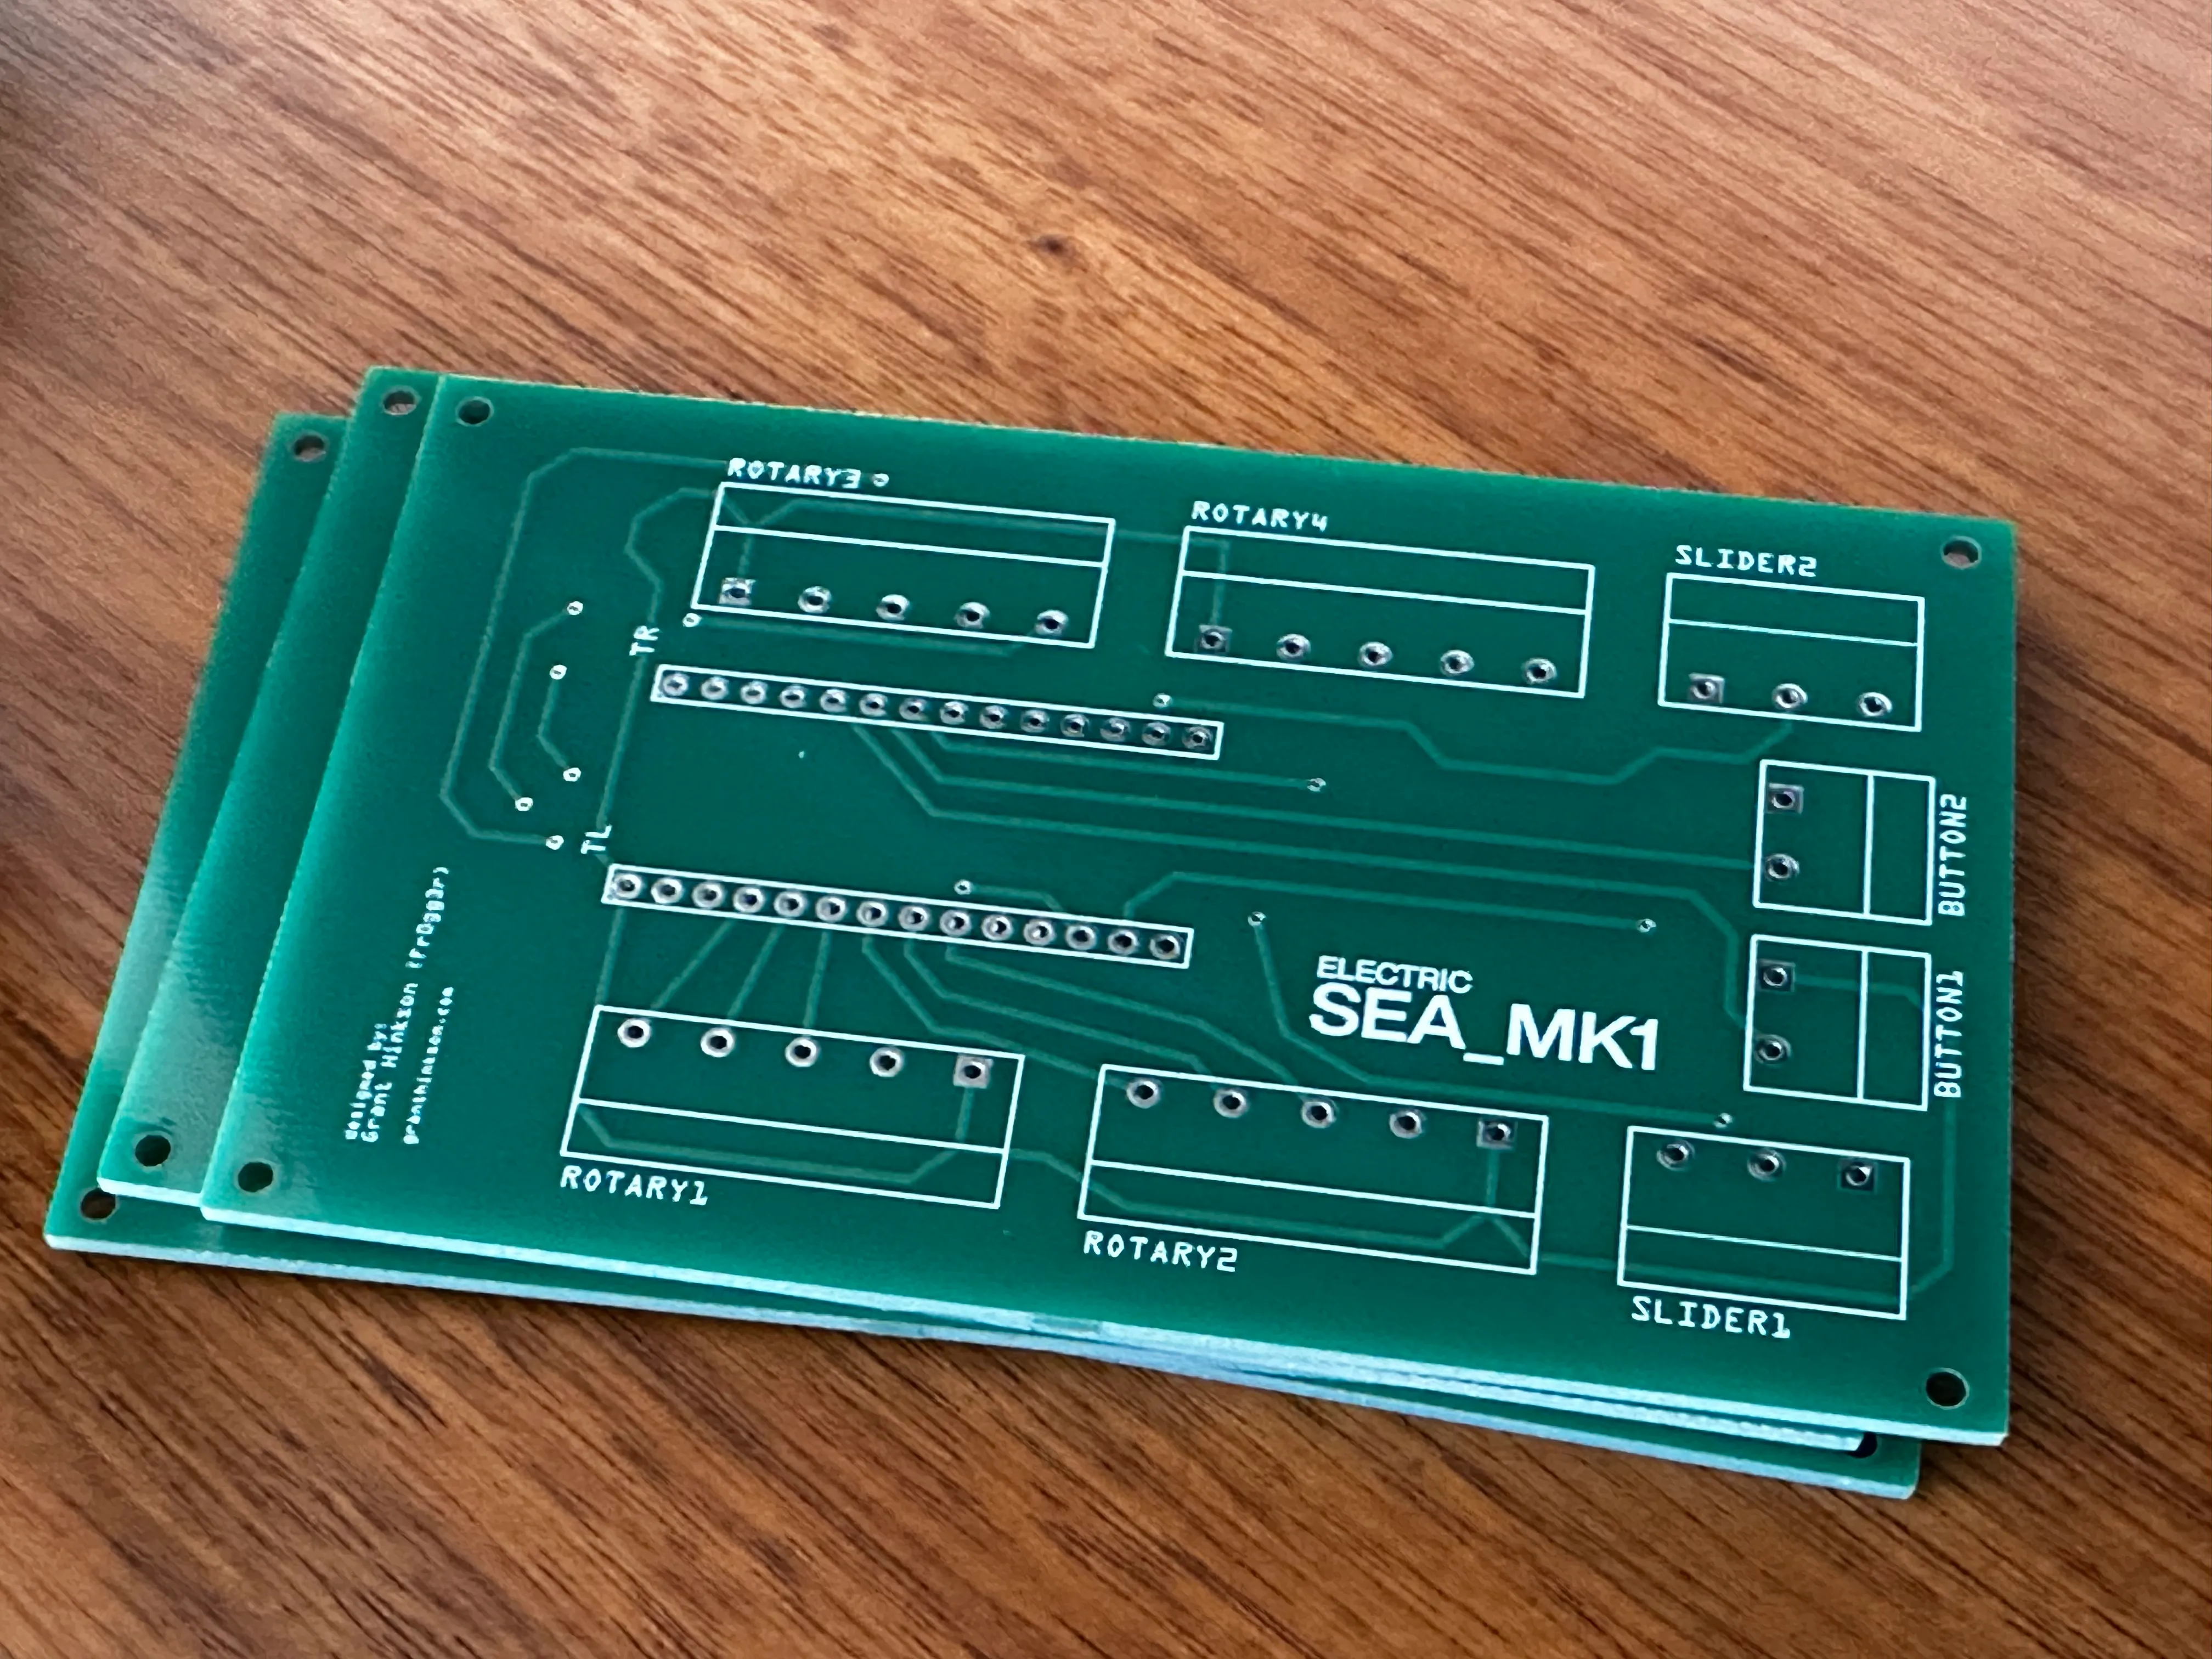
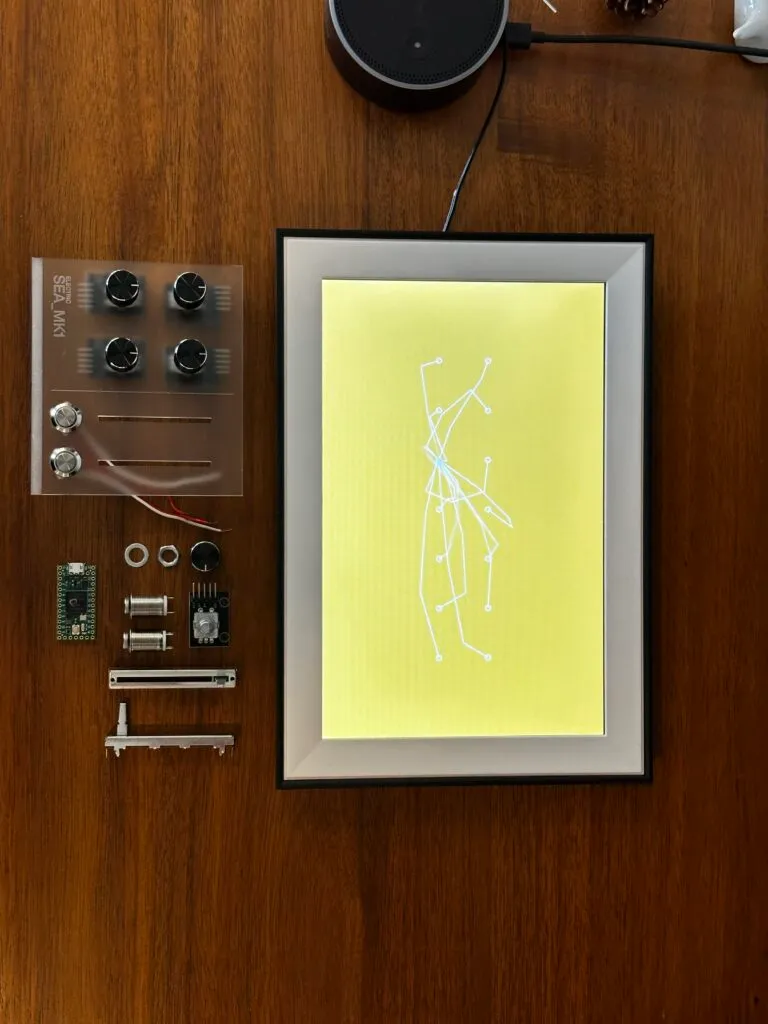
- Build your very own ELECTRIC SEA_MK1, a MIDI controller custom designed specifically for this event
- Learn to flash Arduino micro-controllers and customize hardware behavior
- Build dynamic, web-based art that responds to hardware input
- See how AI coding tools (Claude Code, OpenAI Codex, etc.) can accelerate your capacity to learn and build

Post-Workshop Event Video
The Result
This video shows the first round of MK1s being made and then put to use at the Electric SEA showcase!
Discord
https://discord.gg/wjxuJBEqNr
Workshop thread: https://discord.com/channels/1372363076023750696/1485748877759086653
Requirements and Pre-Work
Requirements:
Personal Laptop with ability to install software
Software Preinstalled (Nice to Have)
Before arriving, the more of the prerequisite software you have installed, the better! Get stuck? Move on to the next and we’ll make sure you’re set up in the workshop on Day 1.
Arduino 2.x.x: Download and install Arduino IDE – Arduino Help Center
> Teensyduino package: Teensyduino: Teensy support for Arduino IDE
Visual Studio Code: Download Visual Studio Code – Mac, Linux, Windows
NodeJS: Node.js — Download Node.js®
Claude Code or similar (ChatGPT Codex, Google Antigravity, etc.) – I recommend installing one of these tools for which you already have an account. They each want you to authenticate with your account prior to using (e.g. sign in with Google to use Google Antigravity).
Google Chrome – the most reliable browser for webmidi support.
How We’ll Work
On Day 1 we’ll start by physically assembling the ELECTRIC SEA_MK1. This is a midi controller that includes 4 rotary encoders (each with push buttons), 2 vertical sliders, and 2 additional push buttons. Once assembled, we’ll flash the microcontroller and test that all inputs are working using a simple web-app.
We’ll then build a starter art project using Claude Code (or similar) that can respond to our midi controller input.
Success on Day 1 is a working web app that responds to your brand new custom controller.
Day 2 is about refining your idea and thinking about the user experience. We’ll share the output of our workshop in the Saturday event, so building towards something that is approachable and understandable will be an area of focus.
Resources / Inspiration
These are just a few links to give you some ideas/direction for your project. Get inspired!
Generative Gestaltung – one of my favorite Processing books – this is the web-based version
Three.js – JavaScript 3D Library
OpenProcessing – Creative Coding for the Curious Mind
Patatap — https://patatap.com/ A keyboard-triggered audio-visual instrument built with Two.js and Web Audio API. Each key triggers a unique sound paired with a geometric animation.
Chrome Music Lab — https://musiclab.chromeexperiments.com/ Built by Google’s Creative Lab using Web Audio API, WebMIDI, and Tone.js
UPDATED STARTER PROJECT
The following zip file includes the Teensy 4.0 firmware, ESMK1.js library, and examples.

Create a copy of this folder and rename it

Click this icon to open a Claude window
Prompt Guide: Open Processing Example
- Create a copy of the OpenProcessingExample in the sketches folder of your workspace
- Rename the folder to [YourProjectName]
- Find a starter project on openprocessing.org, copy and paste the contents of its code view into the
sketch.jsfile in the folder you just created - Open the
index.htmlfile and remove all of its content. It should be blank. - Save both files.
- Open your Claude window (see reference image on left)
- Customize the prompt below, based on your desired outcome
Reference the board inputs using the following names:
Rotary Encoders:
ENC1, ENC2, ENC3, ENC4
Sliders
SLIDER1, SLIDER2
Push Buttons
BTN1, BTN2
Example Prompt:
ok, our first openprocessing test.
folder: sketches\[Your Folder Name]
I have an empty index.html file and sketch.js that includes the code from the openprocessing.js site.

Please stage the index.html with the correct library references for this sketch to work locally. let's start by having ENC1 and ENC2 adjust the PARAMS.noiseAmt and .noiseScale
Testing and Iterating
Once the changes have been made, you need to test your file.
Open the updated index.html file in Chrome. Click Allow to let it connect to your midi controller.
See if the changes behave the way you expect. Keep iterating and be specific with your prompts.
Example Follow up from the original NoisyCircles demo:
i'd like to update this sketch so that the shapes are animating withing the set range. the noisyCircle should oscilliate in some way but still respond to the parameter updates
The previous prompt resulted in the desired animation effect.
Prompt Guide: Defining a Reusable Library
The following is the starter prompt I used to create the ESMK1 javascript library that is being used by our examples. My conversation continued after this initial prompt, but pay attention to what I was specific about and what I was open ended about.
Prompt (Me):
OK great, i'm going to describe the desired usage of these inputs for videoLayout.

before implementing, I'd like you to know that I am going to use this controller across many projects. I'd like you to consider creating a standalone javascript file with a very clean usage implementation. After the videoLayout update, we're going to take projects from openProcessing and update those to use this controller.

I'd like to ensure we reference all controls the exact same way across projects. Perhaps we define statics/enums for referencing the buttons (e.g.: ESMK1.ROTARY1.., ESMK1.SLIDER1, etc.)

update the context file with this naming table. let's agree on approach, then create standard library, then documentation, then build out [exampleName]
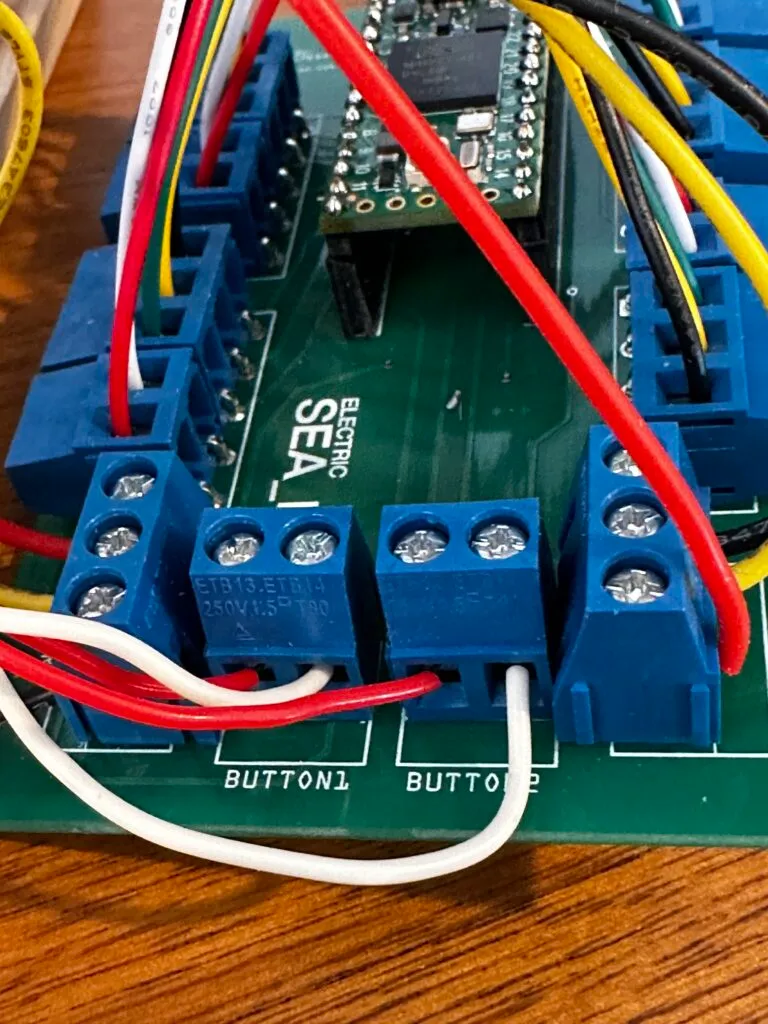
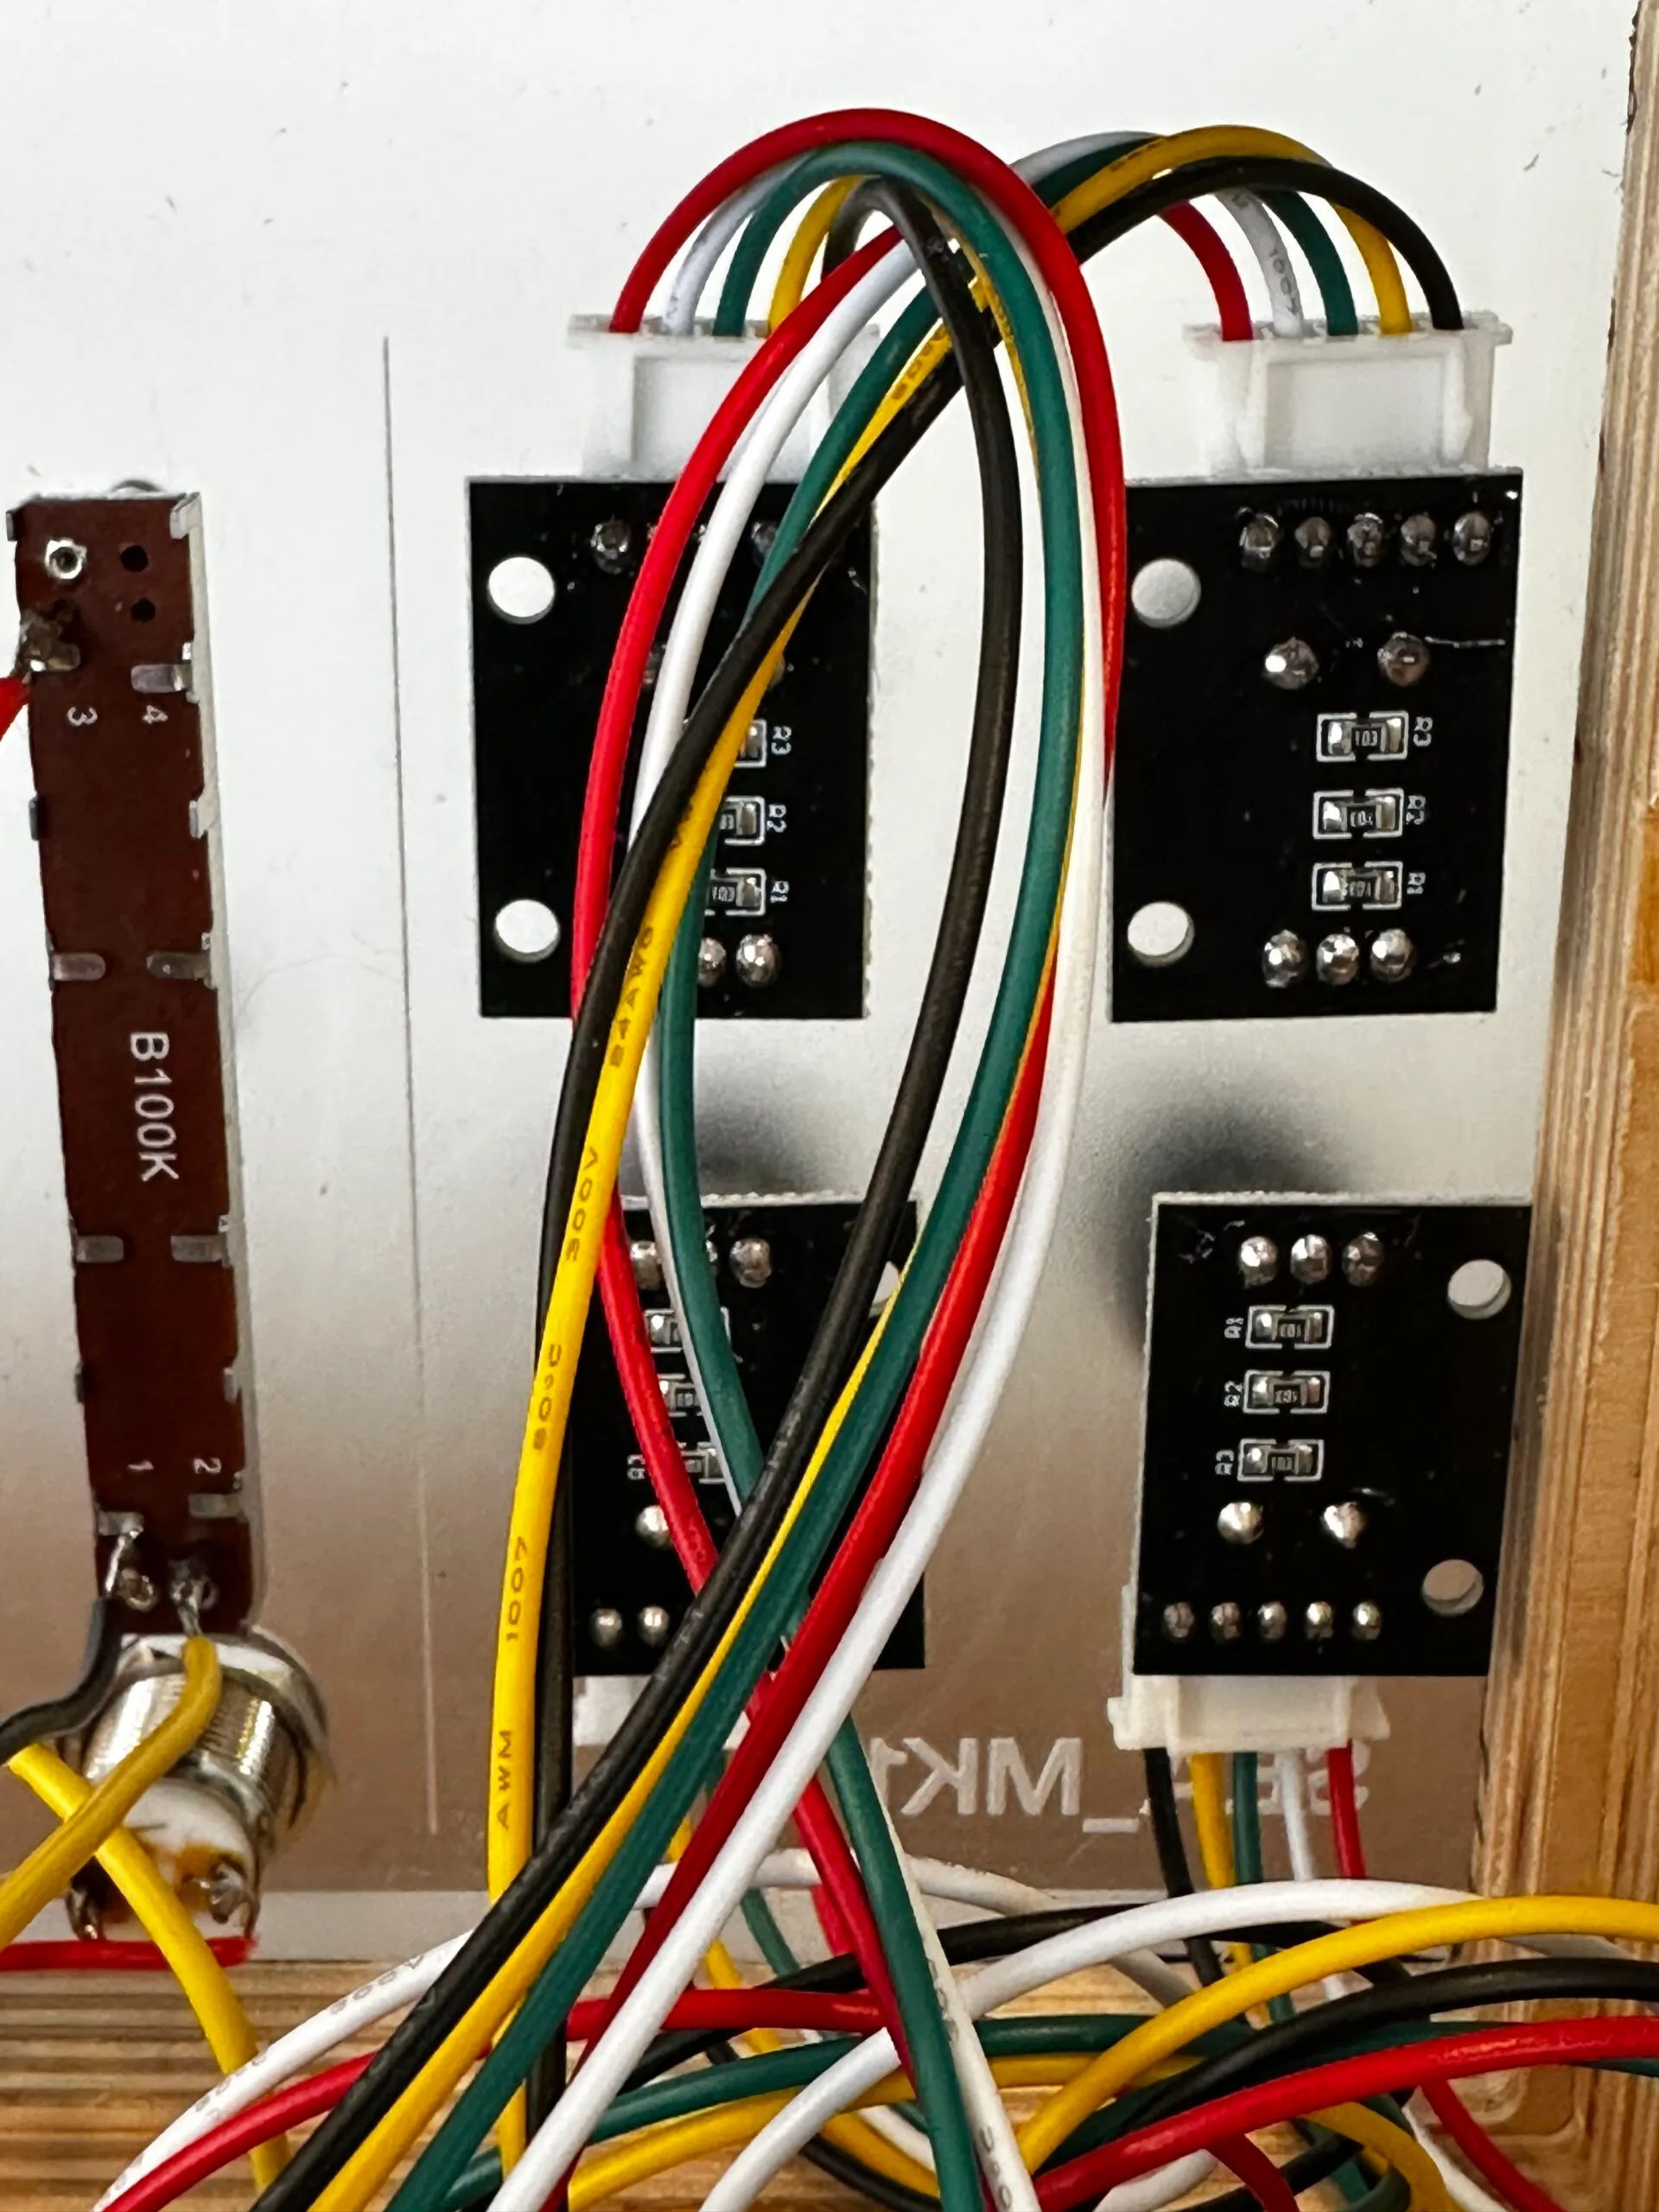
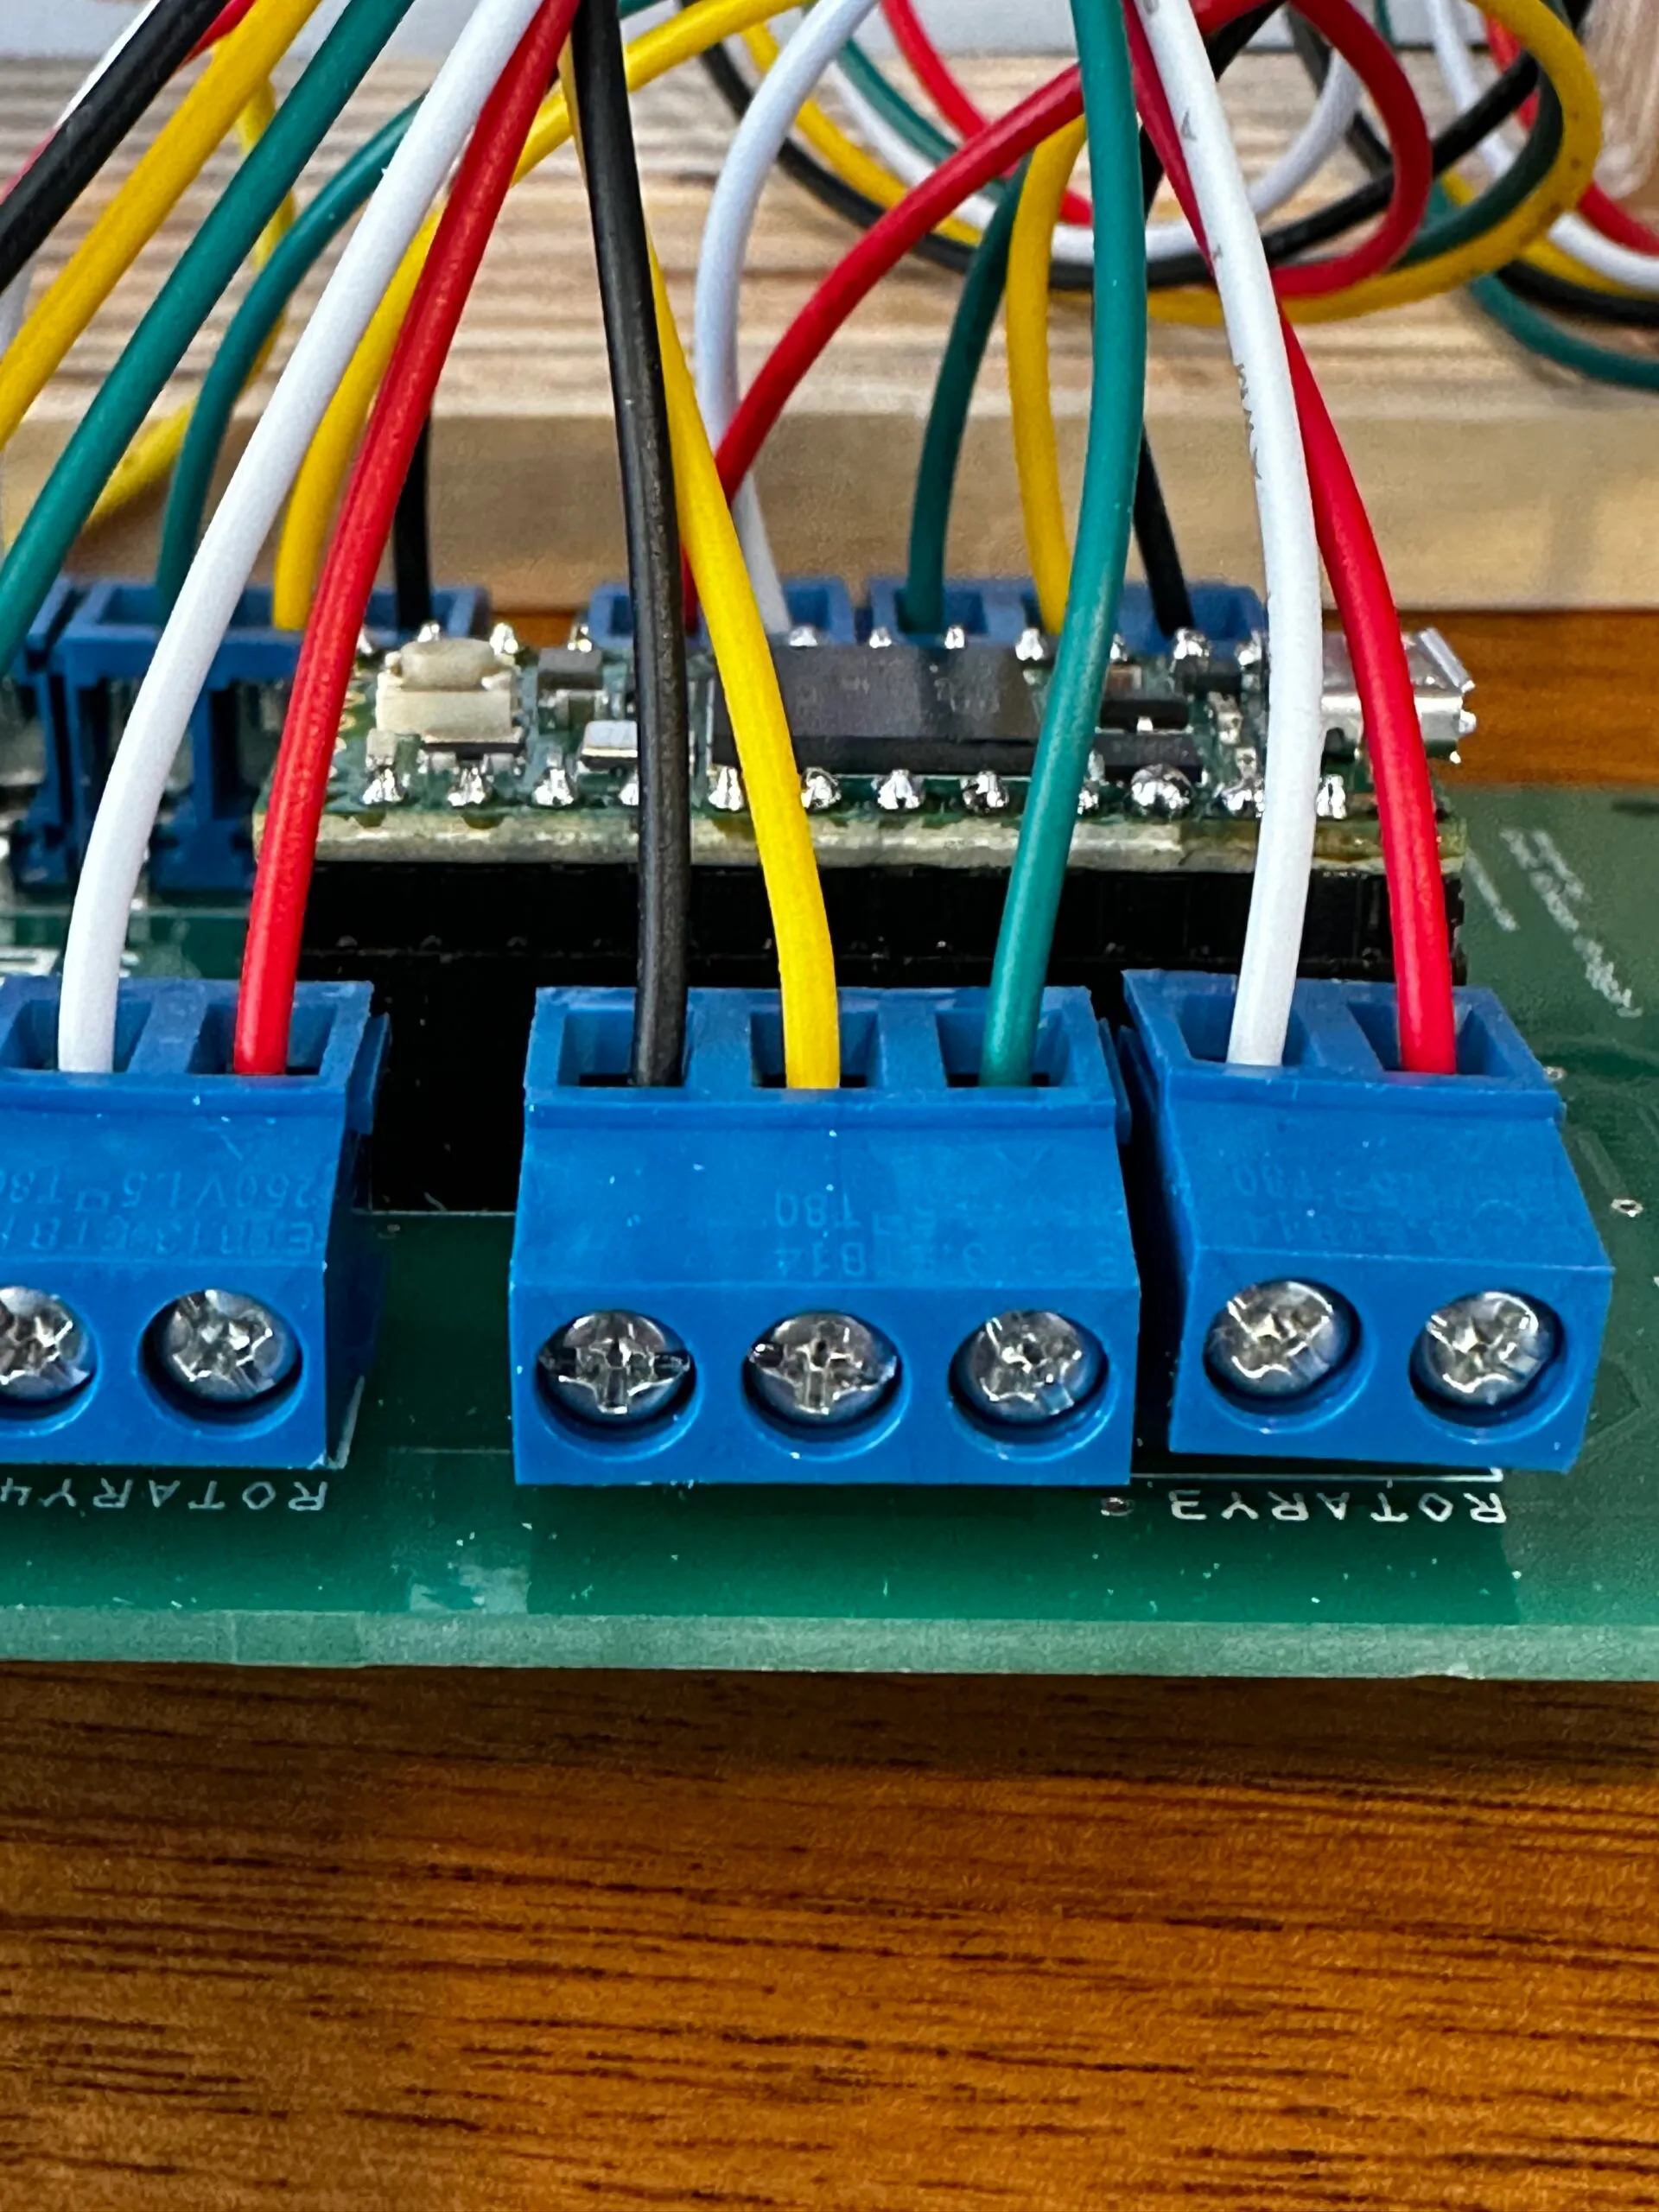
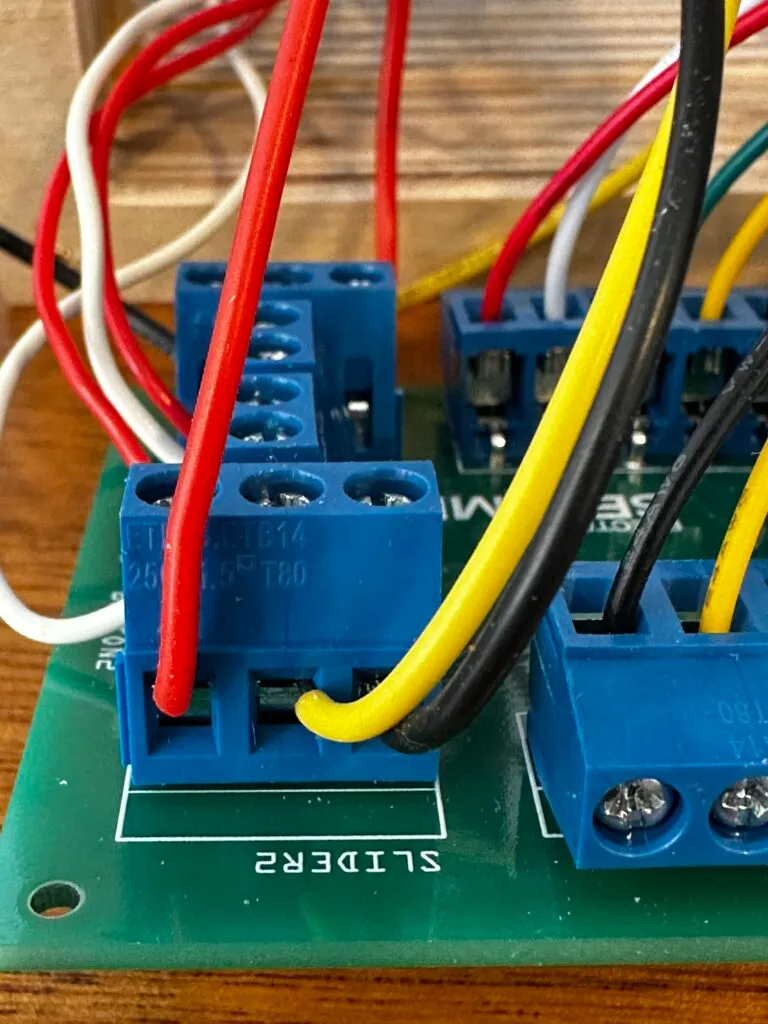
Reference Photos
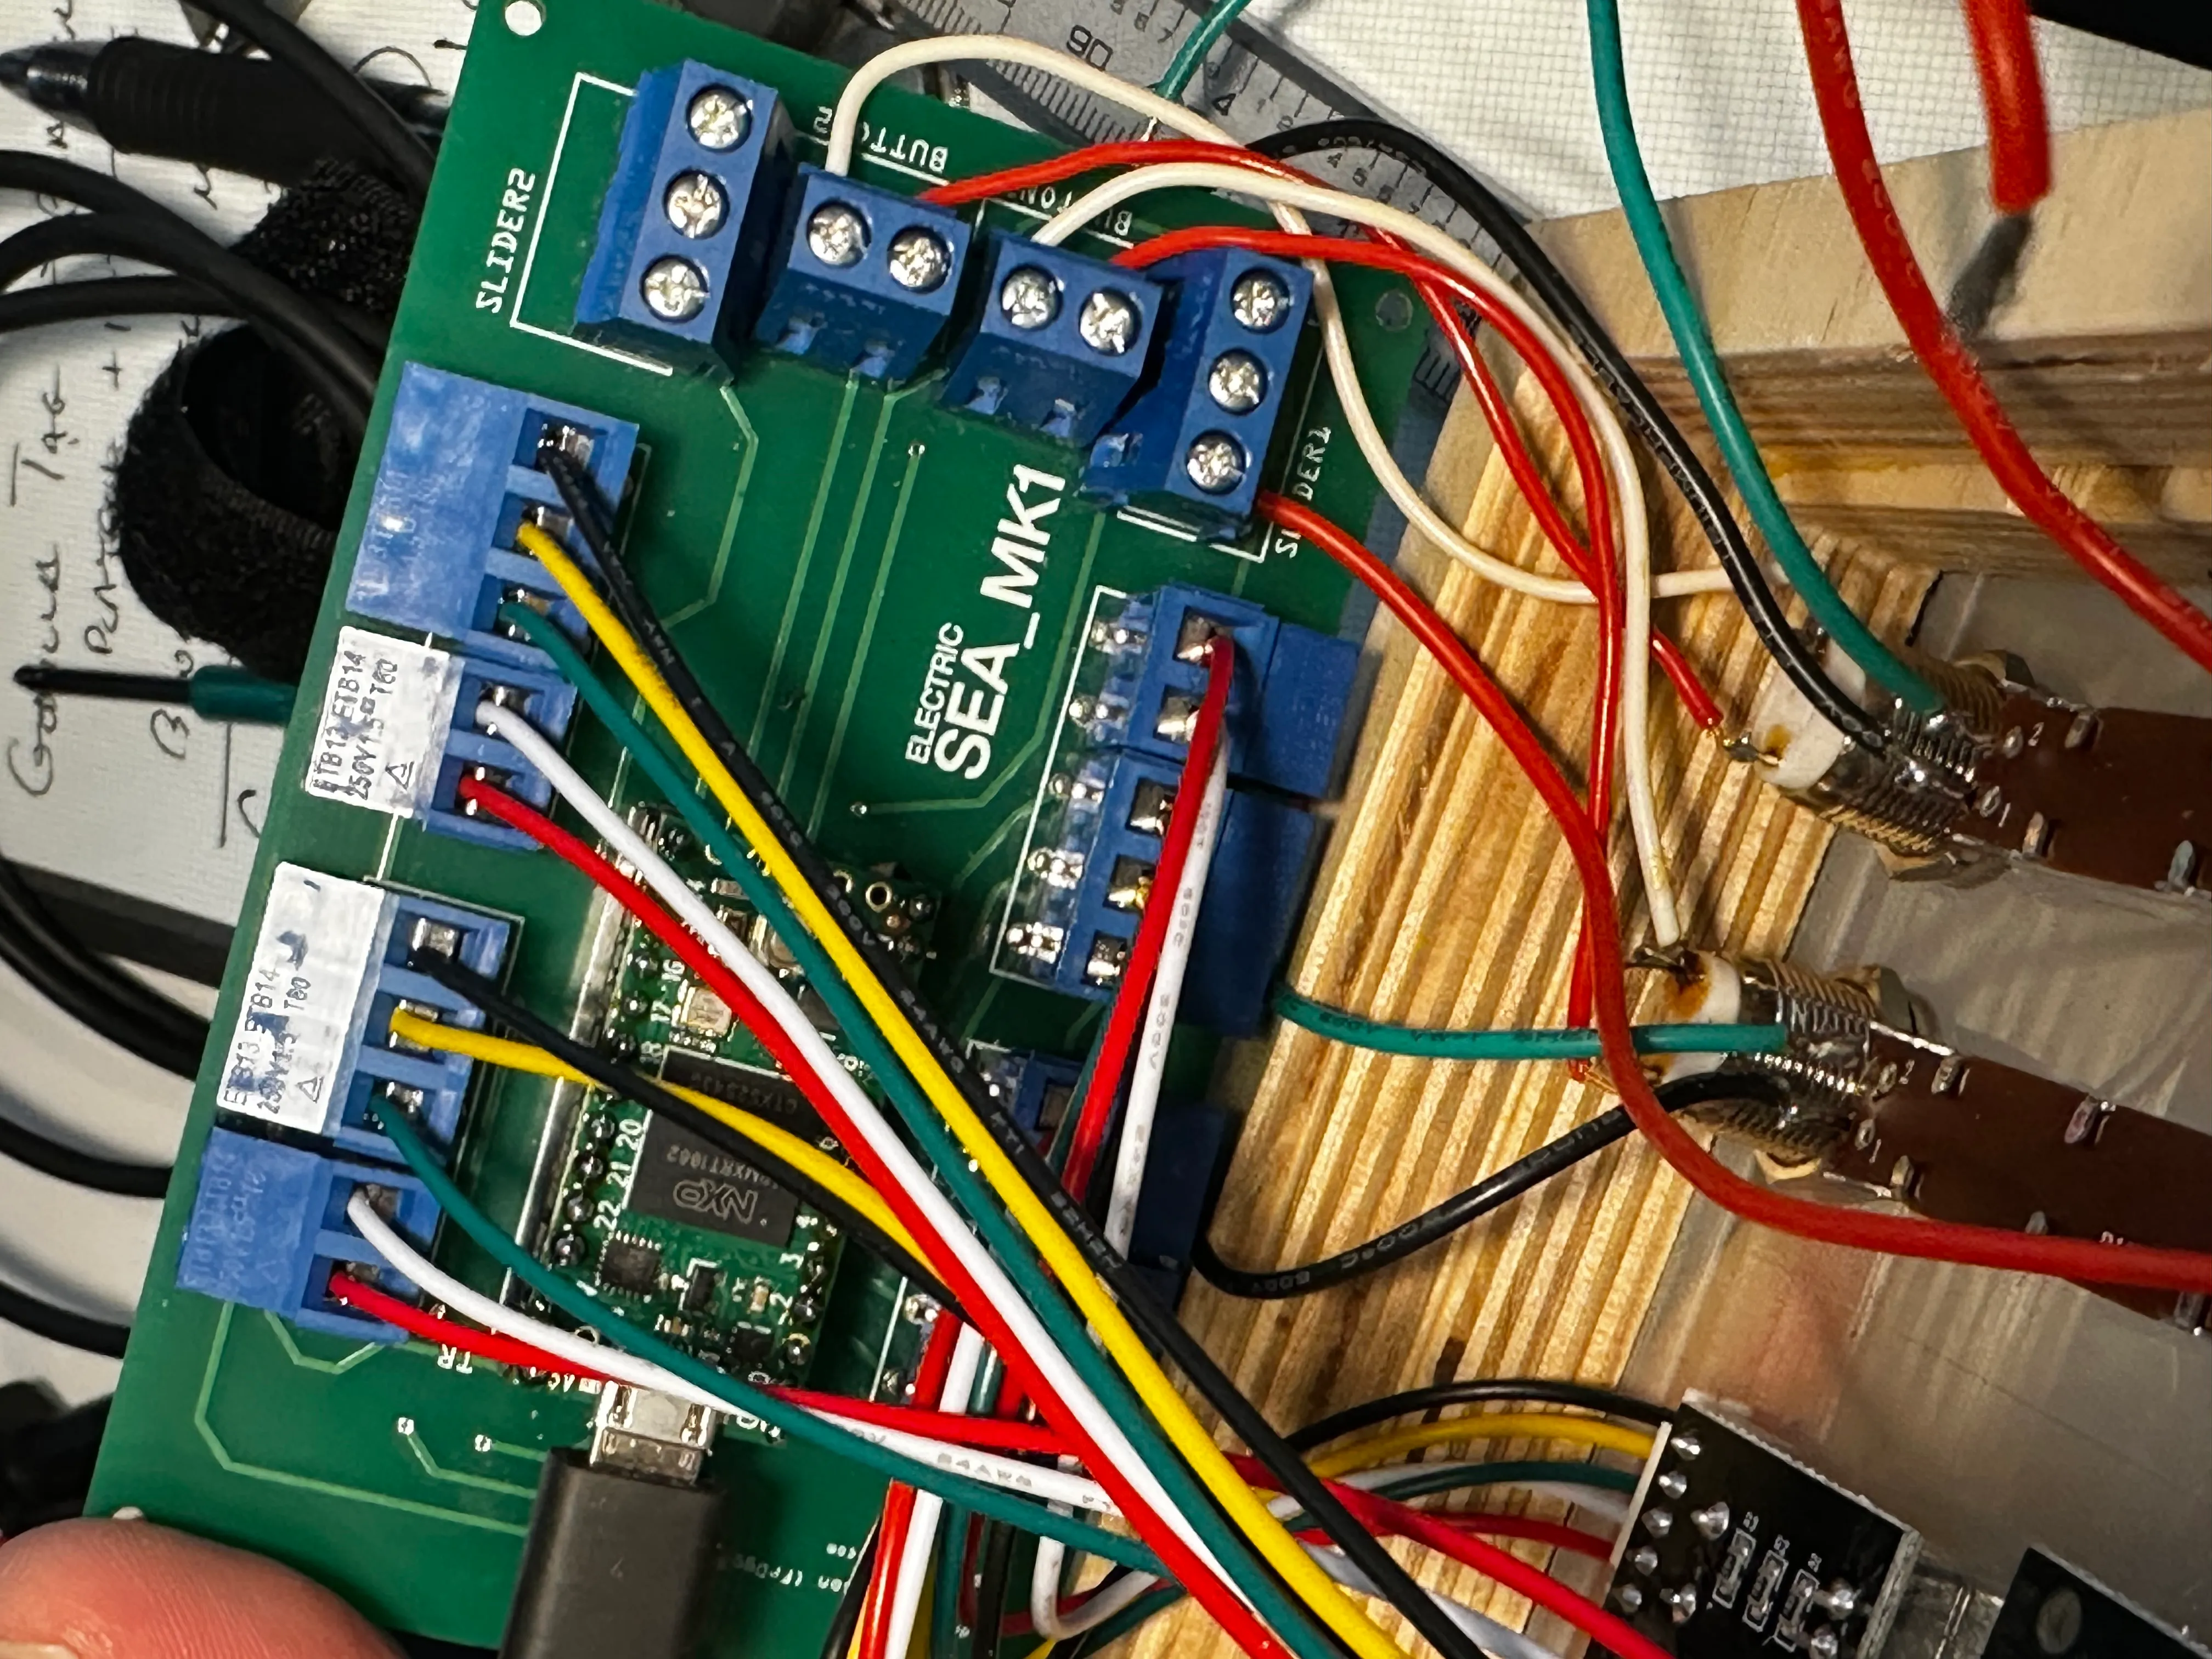
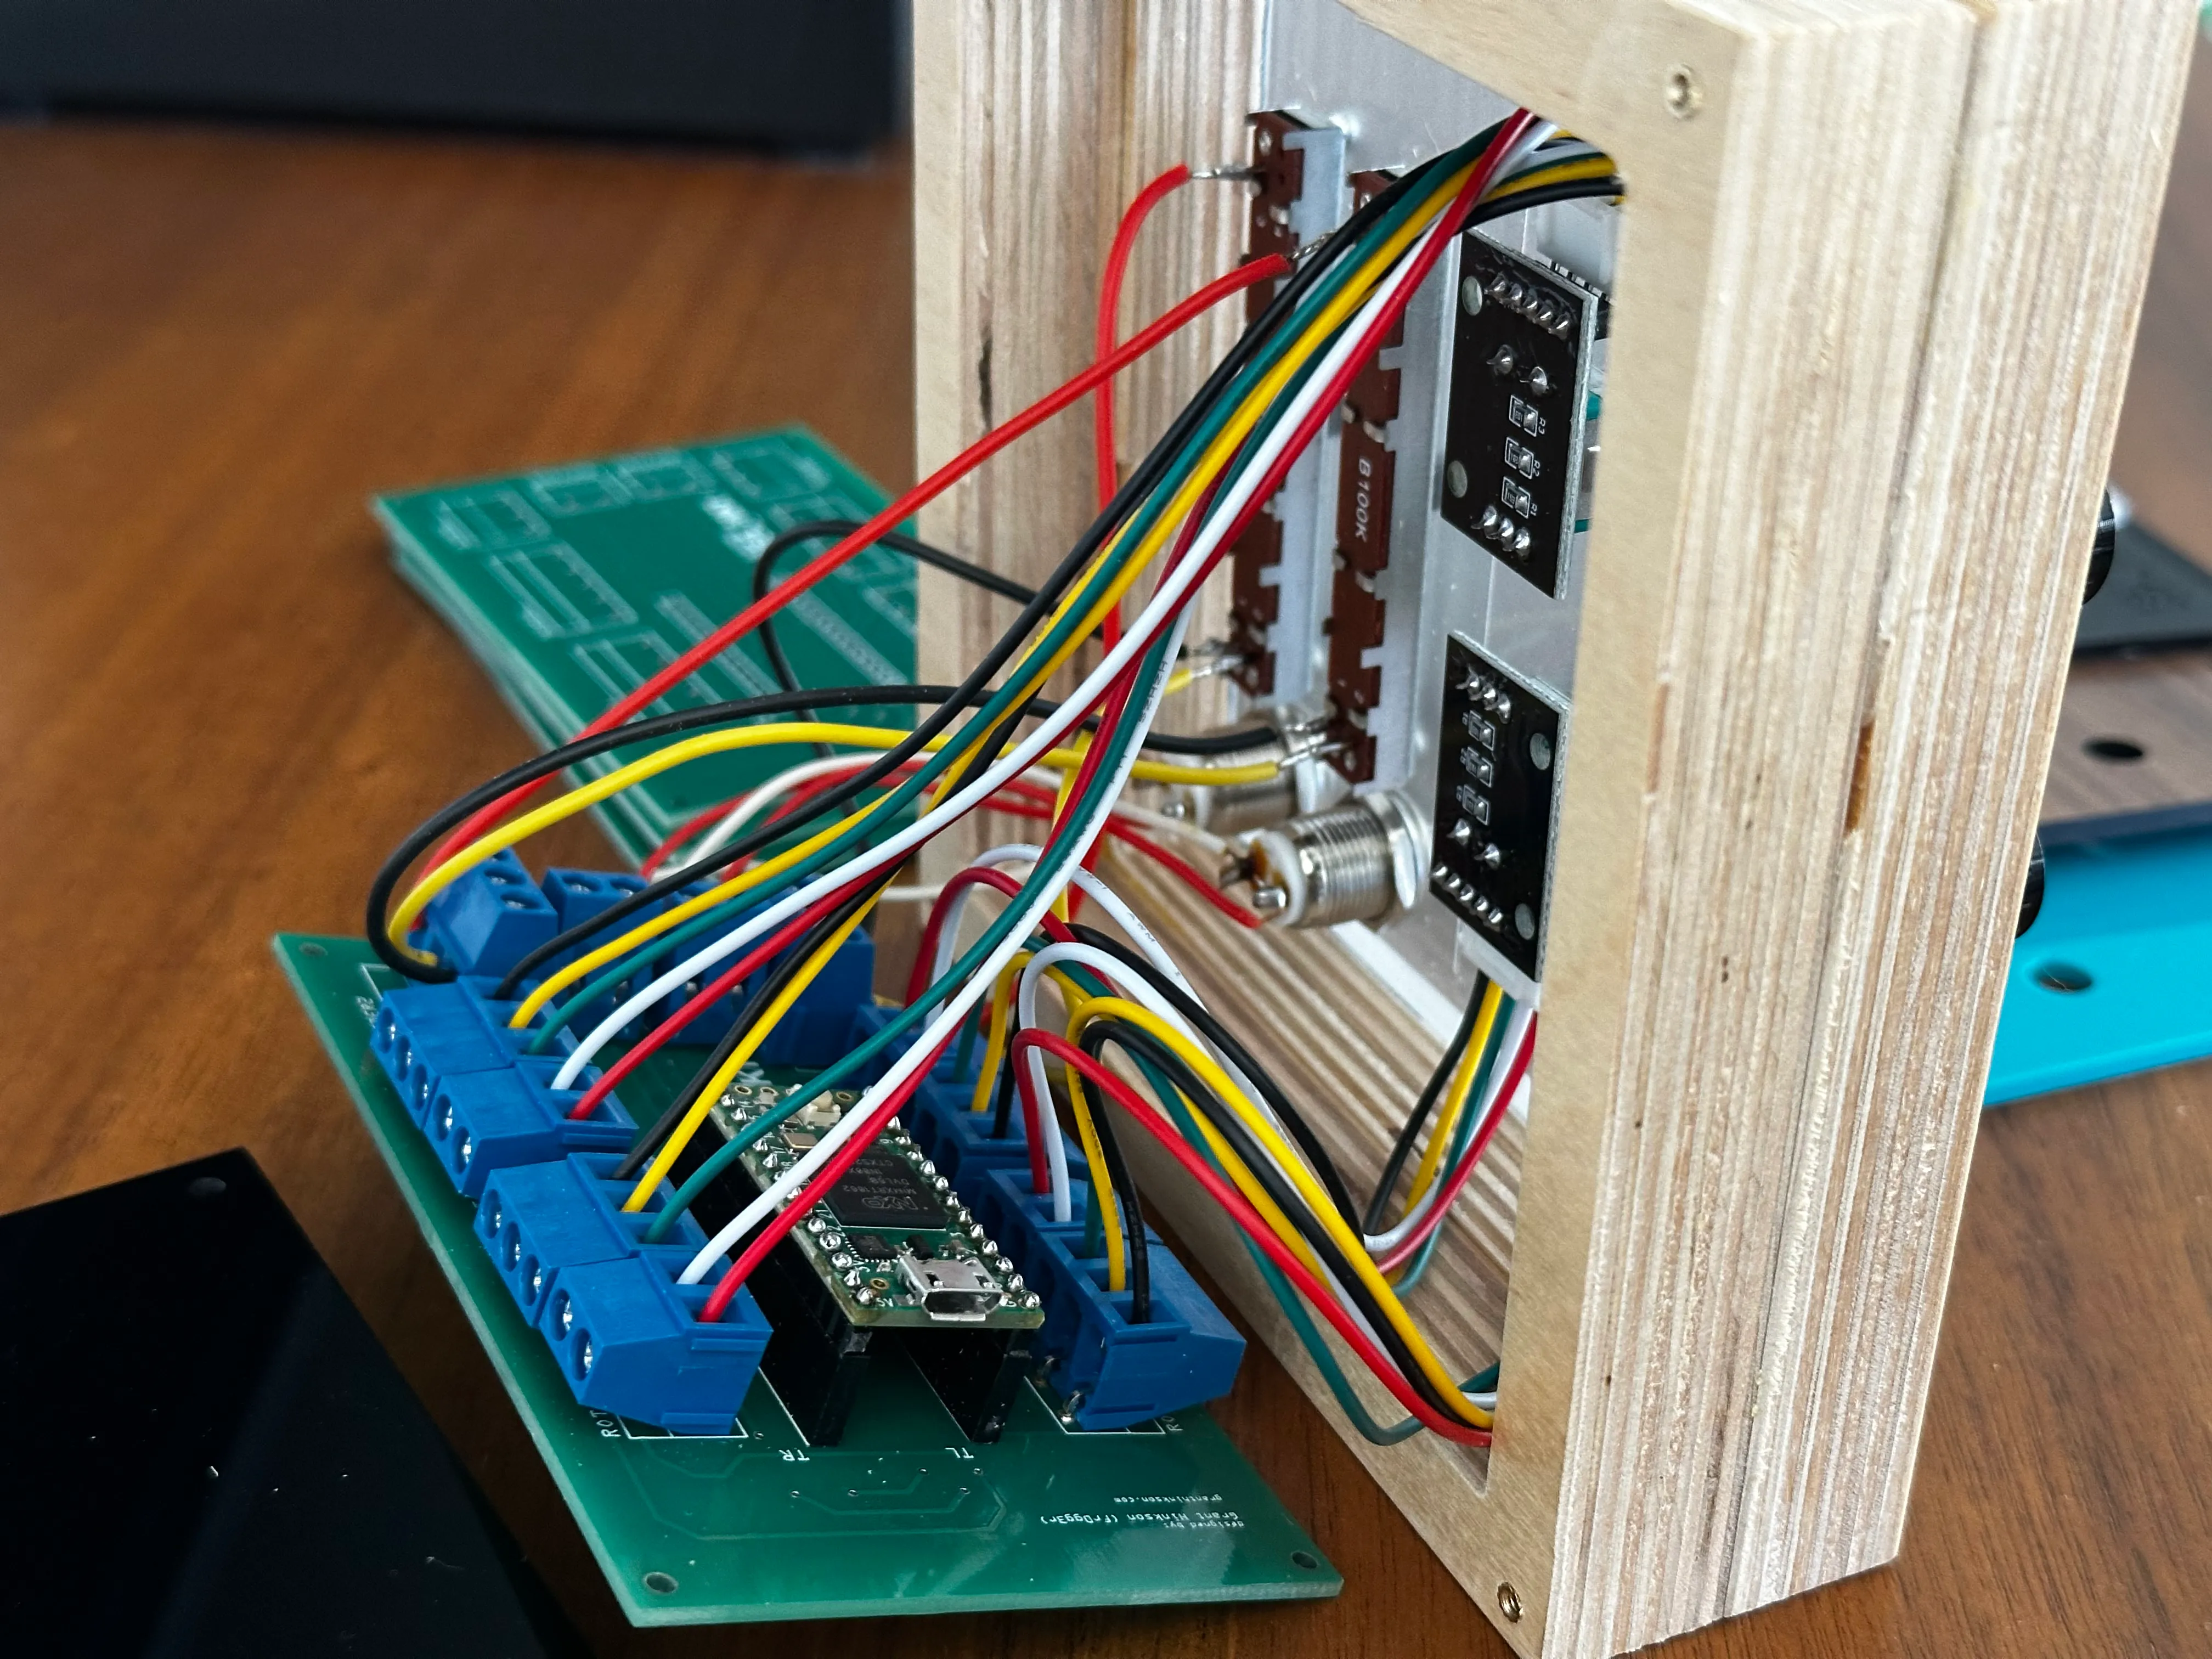
Use these photos to ensure you wire everything correctly.
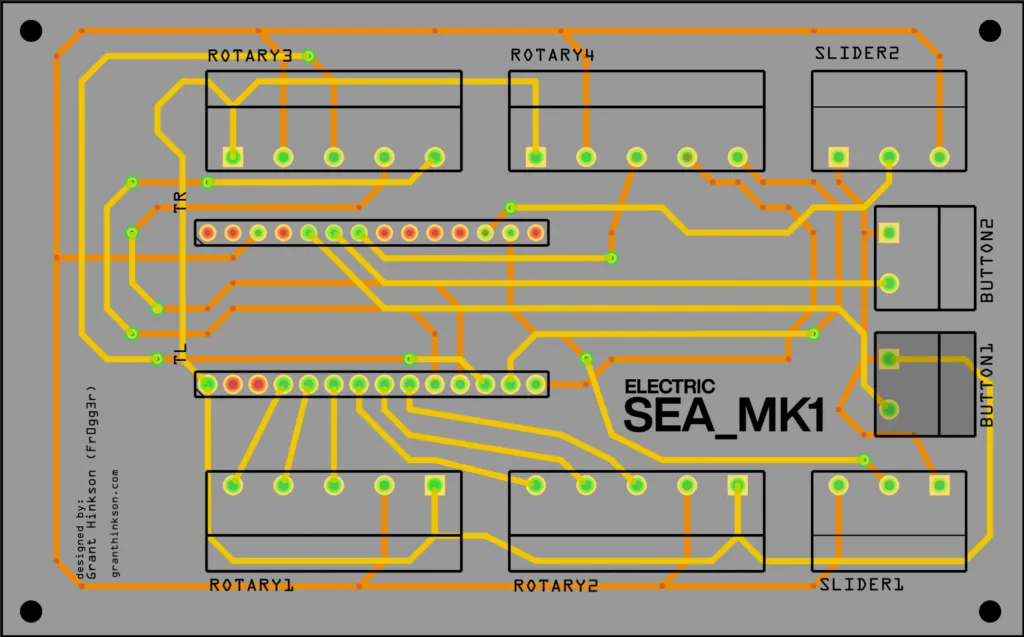
Wiring Diagram
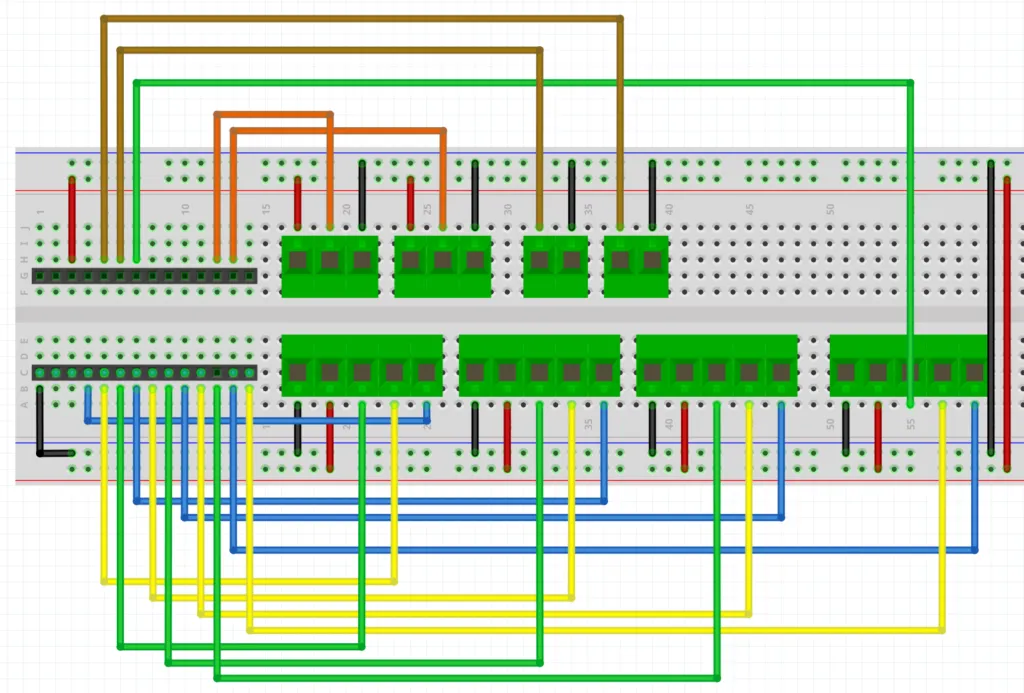
Rotary Encoders
Rotary Encoders go into Rotary 1.. 4
Expected Positions
From the front, Rotary 1 is lower left, Rotary 2 is lower right, Rotary 3 is upper left and Rotary 4 is upper right
The Linear Sliders (Potentiometers)
Red wire goes at the top:
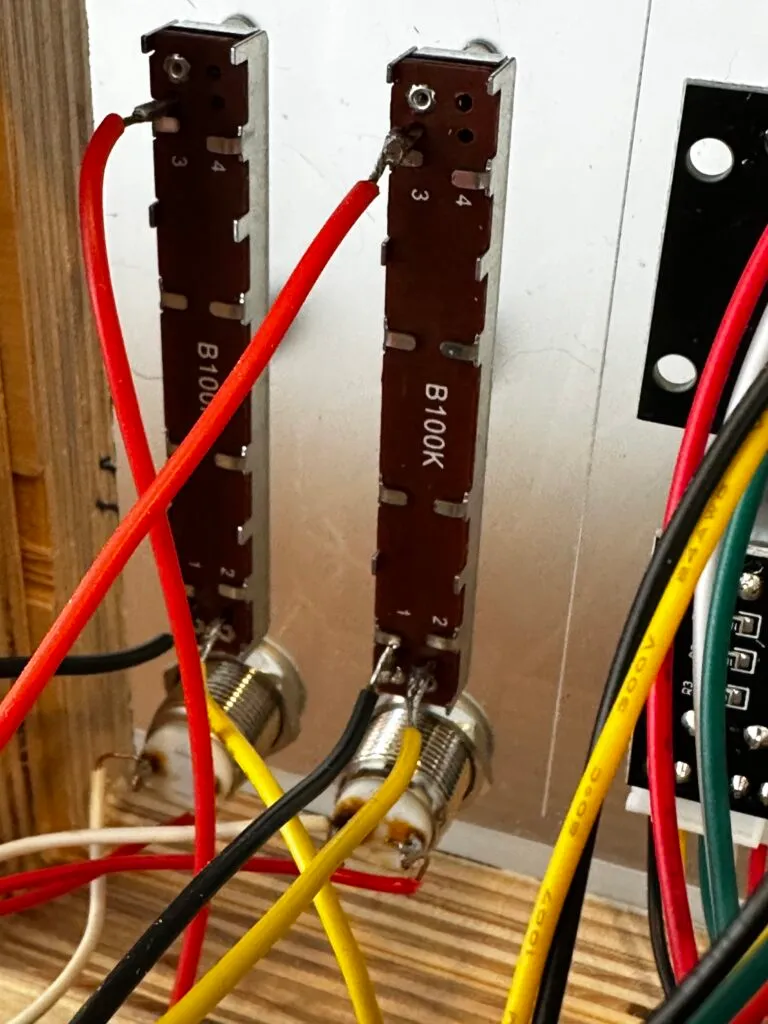
Slider1 (left side when looking at the device) and Slider 2 wiring:
Button wiring:
Wire order does not matter on the buttons, but for consistency, I like to use white or black for the right terminal.